 If you haven’t discovered this delightfully chewy and nutty ancient grain, I’m telling you, you are missing out!!! It is extremely chameleon-like, that is it is easily adaptable to being a delightful addition to both sweet and savory dishes, be it breakfast, lunch or dinner or it can definitely stand on it’s own as a hearty side-dish.
Honestly, the dish and recipe that I’ve highlighted below is probably the most NED (that is Nutritious, Easy & Delicious) breakfast you will ever whip up yourself with already prepped items in your fridge. Wheat Berries, Carrot Kimchi and an Olive Oil Fried Egg are the supporting actors in this star dish.
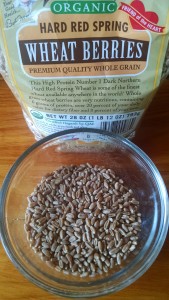
Wheatberries are the whole megillah or whole schmeer or EVERY ASPECT of the edible wheat germ: bran, endosperm and germ. The specific type of Wheat Berry I’m recommending is the wheat kernel with the most protein punch for the grain, that is Hard Red Spring. Hard Red Winter Wheat Berries have a lesser protein punch and are typically used for artisan breads, yielding a crisper crust.
History- You might think that wheat/wheat berries have been around since the beginning of time, but no, barley deserves that distinction, going back to the Stone Age (see Discover the Goodness of Ancient Grains: BARLEY). However, when the Roman empire, heavily influenced by the Greek culture, began expanding from a small kingdom to a vast empire, things changed for the “new”. With that expansion the Romans were exposed to a massive volume of nuanced provincial foods, along with their culinary techniques. It was in this era that wheat bread was found to be superior to barley bread in fluffiness, taste and shelf life. Barley produces a highly nutritious but dense loaf of bread, lacking moisture and spoiling easily. For wheat kicks barley’s tail in gluten content, thus giving bread the ability to rise and retain moisture. Thus barley was relegated at this point, forever more, to being the poor stepsister of wheat, for now the rich opted for only wheat, making barley the grain of the poor.
Nutrition- Wheat Berries offer a significant fiber (6 grams per serving) and protein (6 grams per serving) one-two punch, especially compared with white rice (0 grams of fiber and 3 grams of protein per serving).
Iron, Calcium, B1 and B3, Folate and Potassium are also star nutrients in Wheat Berries’ portfolio. B1 or Niacin is essential in nerve health because of it’s role in the synthesis of the neurotransmitter acetylcholine, thus it’s use in the treatment of fatigue, depression or irritability. B3 or Thiamine plays a primary role in the synthesis of every form of food we eat: fats, carbohydrates and proteins and is also noted for it’s key role in nerve and brain health.
For more information on star nutrients all ancient grains contain, check out Discover the Goodness of Ancient Grains.
Preparation-I’m going to make a recommendation for wheat berries that I haven’t made for any other ancient grain: cook a batch and store it in the fridge.
The reason I recommend this is that wheat berries take about 1 hour of cooking time and by having it ready-to-go in the fridge, you can simply add it to a host of dishes.
So how do you cook it?
First, there are three general methods for cooking grains:
a.) Simmering-Bring liquid and grain to a boil and simmer with a cover.
b.) Pilaf– This method is akin to braising. Coat the grain with a heated fat and onion mixture then add broth and finish the product in the oven.
c.) Risotto-This is a combination of both simmering and pilaf methods.
The simmering method is the easiest and most efficient method for this grain.
Other Wheat Berry tips:
a.)Try simmering wheat berries in a low sodium broth or ½ broth and ½ water. The broth gives the grain a nice flavor boost!
b.)Liquid to Grain Ratio is about 3 parts liquid to 1 part grain.
c.) All of the liquid is usually not absorbed with this grain after cooking so use a colander to remove excess liquid either before adding it directly to a dish or before storing it in the fridge.
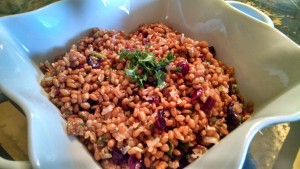
Let’s talk versatility, wheat berries can EASILY be dressed up with simple ingredients. You can add them to salads, soups, casseroles or like I did with this dish, adding only craisens and toasted pecans and a very small amount of butter for an tasty side-dish:
Menu and Recipe Idea- This breakfast recipe is an absolute home-run on all fronts. It hits it to first and second base because of it’s amazing flavors and textures but it rounds third base and hits a home run with it’s superior nutritional profile!
If you haven’t been introduced to the wonders of Kimchi, you are in for a treat! Kimchi is an absolutely amazing super-food that really needs to be a permanent player in your go-to recipes. Kimchi is a gut-health nutrition powerhouse for it’s weight loss, immune boosting and brain health properties. See SUPERFOOD RECIPES-Gut Health Foods for a more in depth discussion on kimchi’s health benefits, along with a recipe for the spicy Traditional Korean Kimchi. The carrot kimchi I’ve listed below is the milder version of traditional Korean Kimchi:
WHEAT BERRIES WITH CARROT KIMCHI
TOPPED WITH AN OLIVE OIL FRIED EGG
Ingredients:
2 tsp. olive oil
1 egg
½ cup carrot kimchi (prepped and waiting in your fridge) (see recipe below)
½ cup leftover cooked wheat berries (also just waiting to be used in your fridge)
Procedure:
- Saute kimchi and leftover grain or legumes in 1 tsp. olive oil. Set aside.
- Warm up frying pan then coat bottom of pan with 1 tsp. olive. Oil. Crack egg in pan, salt and pepper if desired. Remove from pan when edges of white in egg, carmelize.
- Plate sautéed carrot kimchi and wheat berries.
- Place fried egg on top.
CARROT KIMCHI
Yield: 1 quart
Ingredients:
3 cups filtered water
1 ½ T. kosher salt
½ tsp. fish sauce
¾ lb. carrots, peeled
¼ lb. red radishes
1 scallion, white parts and some of the green, chopped
2 cloves garlic
1 tsp. grated fresh ginger root
½ tsp. red pepper flakes, or more to taste
Procedure:
1. Dissolve the salt in the filtered water. Filtered water is important because chemicals in the water will interfere with the fermentation process
2. Sir in the fish or soy sauce.
3. Finely julienne the carrots and red radish into matchstick sized pieces. A mandoline or thin slicing blade of a food processor will make this step easier
4. Pour brine over the other ingredients. Press gently on the vegetables and spices to release any air bubbles. The brine should completely cover the other ingredients. If the food floats out of the brine, weight it with a smaller glass jar filled with water. If the vegetables are staying immersed in the brine, just cover the jar they are in loosely with a lid.
5. Place the jar of kimchi on a small plate to catch the overflow that may happen as it starts to ferment. Leave it at room temp. for 24-48 hours.
6. Remove the lid or small jar weight and check the kimchi after the first 24 hours. You should start to see some bubbles and it will begin to develop a lightly sour smell (like sauerkraut, but more pungent because of the garlic and ginger).
7. Once you see and smell the signs that kimchi is actively fermenting, transfer the jar to the door of your refrigerator. This is the warmest part of your refrigerator but still cooler than room temperature-perfect for your kimchi to keep slowly fermenting.
*Recipe adapted from food preservation.about.com
As always, I would love to hear from you, the good, the bad or anything in between!


